 (I had planned on attending CityMusic Cleveland's concert this evening but with an all-day raging headache* and the time I left the office, I couldn't get myself excited enough about hearing another violin concerto to deal with the parking at the venue... I present this post, which was already mostly written, in its stead.)
I'm not sure how many of you remember Part I (A Technology Guy Plays With Lumber) from all the way back in October, if you don't go ahead and take a moment to go back and look at that post, I'll wait for you.
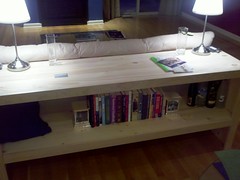
Back so soon? Since that post I've finished out the table by adding a bottom shelf (currently serving as a bookshelf) and both table lights and accent lights with Crestron dimmers so, like every other light in my house, they can be included in "Scenes" that are activated by one button control multiple lights throughout the house. Another benefit is that they can be controlled from anywhere in the world.
(Just between you and me, I think it's kind of amusing that $19 Ikea table lights -- chosen after searching about 10 other places because I liked the clean lines and relatively small size -- are plugged into dimmers that retail for well over $300 a piece)
Here's the finished result:
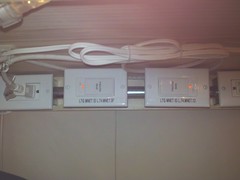
And the dimmers (you can also see an edge of the rope light used for the accent lighting)... these are under the top shelf:
So that's it for the update... Now for the new stuff... (And the first time anyone has seen the 3rd floor in my home since I moved in)
I've been planning for a while that once my income tax refund showed up I was going to do some basic decoration for my master bedroom. It showed up I did** the two things I've been putting off:
The Headboard... I've been sleeping against drywall for a while and I thought this made my bedrooom look even more unfinished than it actually is. About $80 in pine, some 2x4s and nails I had laying around, add some LED lighting left over from another project, an afternoon of releiving fustrations with a hammer and finishing nails and voilla:
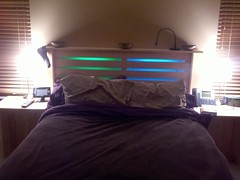
The top piece is just 6' pine, uncut. My original thought was to cut it to be flush with the sides of the headboard, but when I threw it up to measure for length, I thought the overhang gave some visual interest and I figured I'd try it that way for a while. Don't ask why there's a random hat hanging from one side.
The three bowls are my spare change. They were on the table that the TV was on before it got wallmounted and I couldn't figure out where to put them for the time being... so there they are. It's funny, the part that actually took the longest to cut and fit -- the 3/4" spacers in the gaps left, center, and right, are -- barely visible in the photo.
Looking at it I'd like to put something like sandblasted decorative glass in the gaps to add some visual interest. But I don't know where I would procure such an object, let alone inexpensively. Plus: I think it's time I buy new sheets and pillows before I buy glass.
For poof that it is indeed my bedroom, you'll notice the two pine nightstands I built quite a while ago (and I think I want to add shelves and/or drawers) with a Crestron TPS-6X touch panel for control of nearly everything in my home -- that will be another post, eventually -- on the left and a Cisco 7961G-GE IP Phone connected to my home phone system.
The HDTV: As a tech guy, specifically and audio/video automation tech guy, the 15 year old CRT in my master bedroom was starting to become a bit embarrassing. Although I had planned on a 32 or 37", based in picture quality and price I would up with a 40" Sharp Aquos LCD...and then decided to mount it on the wall.
Here's the finished result; for the wall under the LCD my plan is to build something along the same lines as the sofa table, though this time most likely with doors or drawers. That, though, will likely be on hold at least until I figure out what I'm doing with my car:
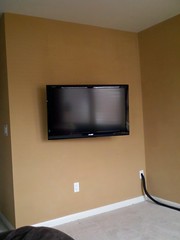
That black bundle of TechFlex goes off to a wall plate with all of the cable connections on it (if you're interested, see this photo). In an ideal world I would have just moved the wall plates, but redoing my garage was enough drywalling for a year so I decided to take the quicker way out.
The wall the TV is mounted on backs up to the walk-in closet, so all of the support equipment to make the magic happen is mounted behind the clothes rods there:
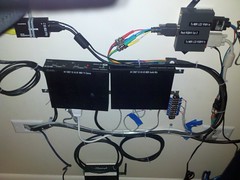
(Click for the larger version which includes a description of everything in the photo, there's still a little cleanup needed here)
Going back in time, this is what it looked like after I had lag bolted the mount into studs and leveled everything, but before the TV was mounted or the wiring was installed... Note the plethora of blue tape marking studs, the top and bottom of the LCD, the top of the imaginary piece of furniture, ideal center line (not possible to hit due to stud location) and all of those other goodies:
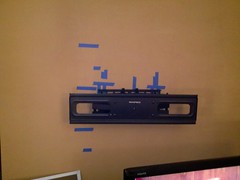
Feel free to check out the complete set of photos for some more progress shots of the mount. Unfortunately, I didn't think to take progress shots while building the headboard, but the two projects had a lot in common with respect to measuring 10 times and plenty of blue tape.
Lincoln
*- I'm pretty sure my body really doesn't like this whole 30-and-blizzard/50-and-sunny extreme. This is the first time I can remember and Advil-resistant headache that literally woke me up at 3:45 AM and hasn't gone away.
** - Before my car issues developed; had my car issues developed sooner my income tax refund probably would have turned into "Lincoln's Car Down Payment" and these would have gone undone for another year.

Yay lighting! Nice apt!
ReplyDeleteThanks! You wouldn't beleive how much of a pain dimming LEDs is... or maybe you would!
ReplyDeleteBut that's probably a good thing, if it was easier and cheaper I'd probably be going (even) crazy(er)